Tutorial
From Mobile to Desktop: Cross Device Communication using WebSockets
In many aspects, smartphones are superior to their desktop counterparts. One killer feature of smartphones are their cameras whose image quality is so much better compared to integrated webcams of a desktop computer.
On the other hand, desktop computers are often more suited for work that requires large screen real estate and for working with files across different apps.
While working on Tracy, a web app that converts photos of sketches and drawings to vector graphics, I wanted to combine the benefits of both device types. I needed a simple way to transfer the drawings in front of me to my computer.
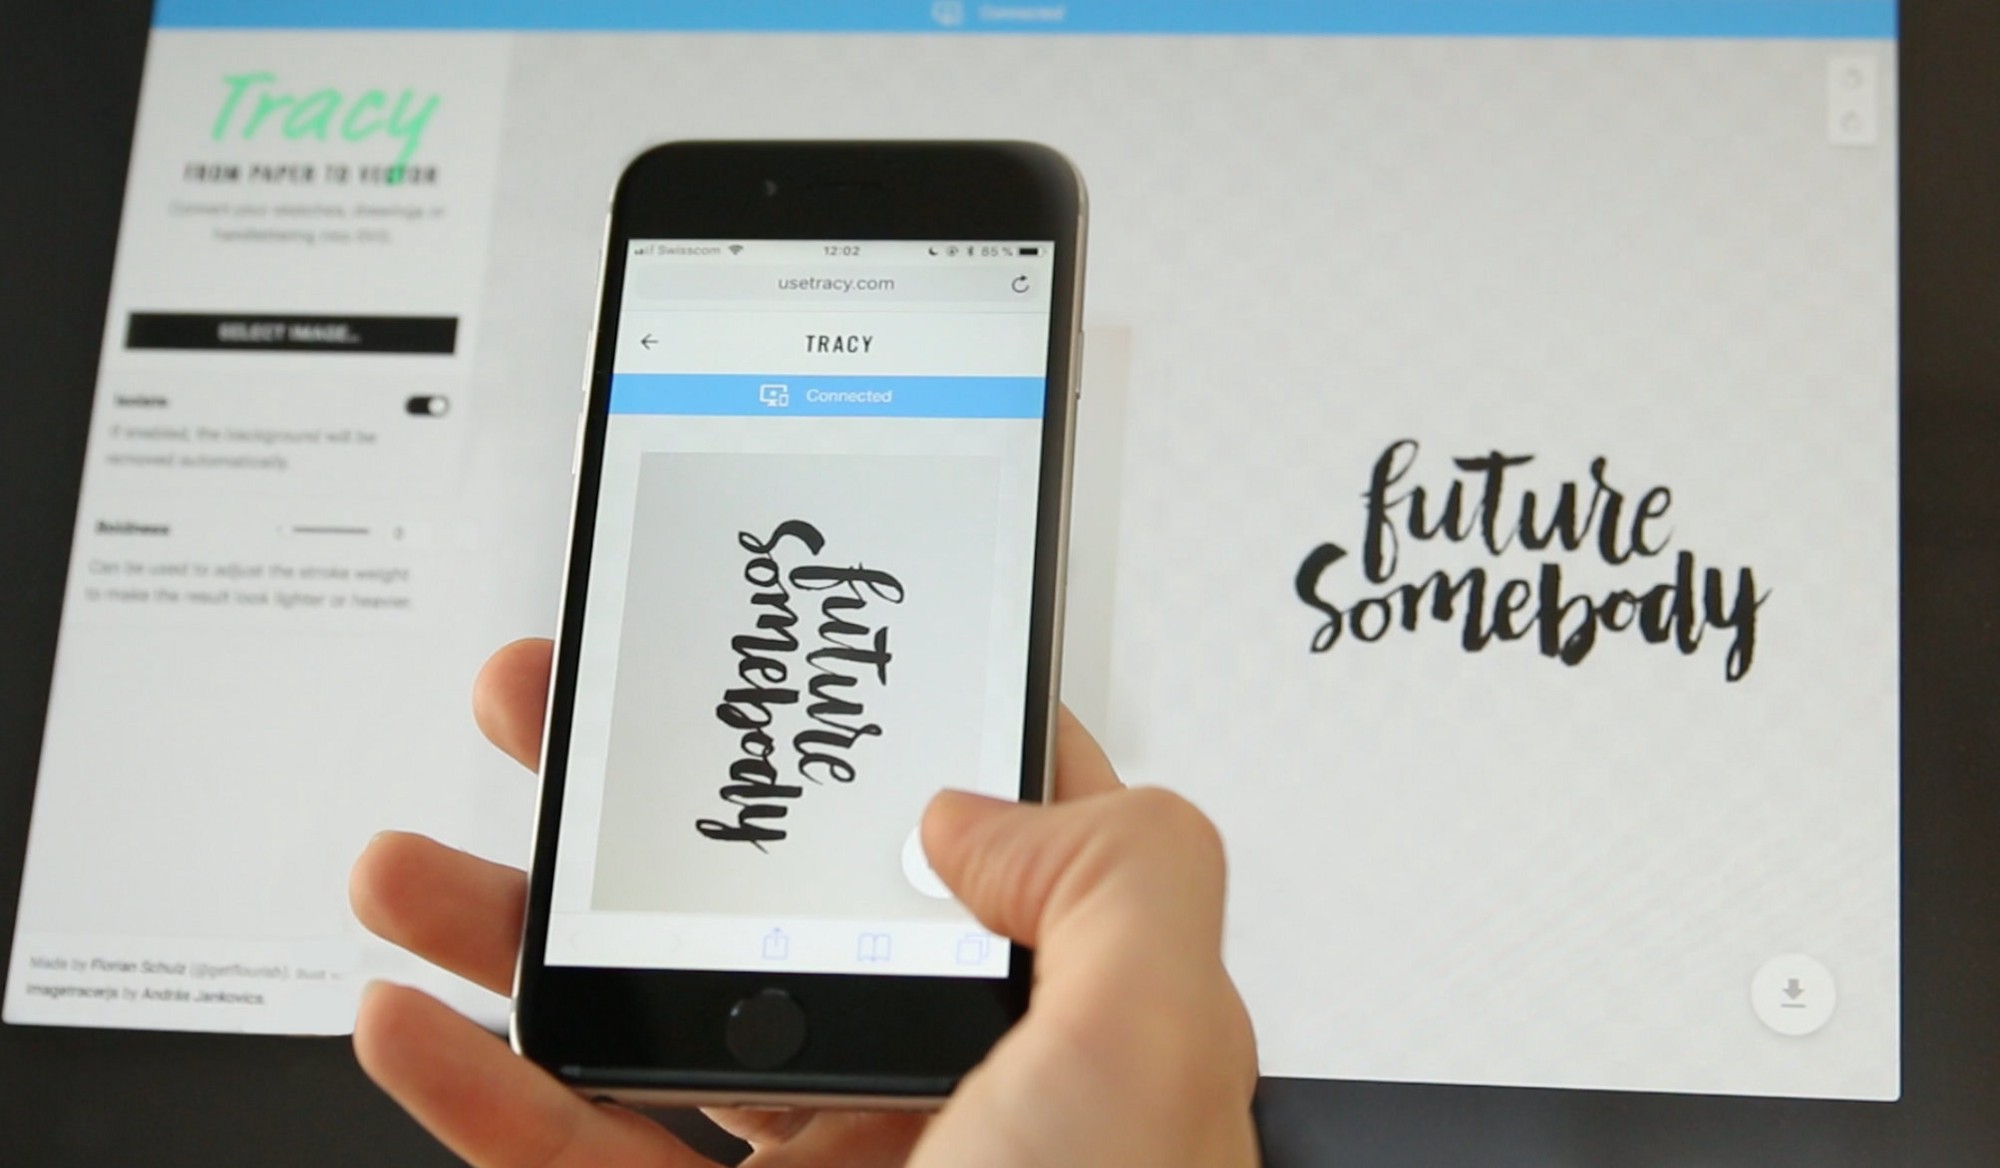
The usual workflow of getting a photo to my computer looks like this: Take a photo, wait for it to upload to the cloud (or get frustrated that it doesn’t work yet again), find the photo in the photos app, drag & drop it into the browser window. Cumbersome. Instead, with WebSockets, we can turn the smartphone into a connected scanner that can transfer photos directly to the desktop web app.
The following article will explain how I use WebSockets within Tracy to enable cross device communication. I will provide code snippets and a step by step tutorial on how to transfer images from a mobile browser to a desktop browser.
What are WebSockets?
WebSockets enable developers to push data between devices in real time without the need to store any data. WebSockets require a server that can send and receive data in form of messages, files, images, etc.
In our case we expect two clients: a desktop website and a mobile website. Both will share data with the server which immediately forwards data to all clients. Similar to a private conversation between you and a friend, we will need a shared channel for our cross device communication.
SocketIO is a JavaScript library that provides a concept of rooms that allows clients to join a room and then emit or broadcast messages to clients in that room. The name of a room can be any string, but in our case it will be a very long random ID that I will explain later.
For the server implementation, we will need Node.js. If you don’t have it, download and install it from here: nodejs.org/en
Then:
- Create a new folder
- In that folder, create a file called
package.json - Copy the following code into
package.json{ "name": "websocket-test-app", "description": "Cross Device Communication using WebSockets", "scripts": { "start": "node index.js" }, "main": "index.js", "license": "ISC", "dependencies": { "express": "^4.16.2", "socketio": "^1.0.0" } } - In Terminal, enter:
cd path/to/your/folder
- In Terminal, enter
npm install
This will install our Node.js project and all its dependencies. Since we have Express and SocketIO already defined in our package.json, both packages will automatically be installed.
Server Code
Now, we will need to open and edit the index.js file. There we will add a few lines of code to setup an Express Server that will listen and react to messages coming through the WebSocket.
In your project folder, create a file called index.js and paste the following JavaScript code:
// Import packages
const express = require("express");
const socketIO = require("socket.io");
const path = require("path");
// Configuration
const PORT = process.env.PORT || 3000;
const INDEX = path.join(__dirname, 'index.html');
// Start server
const server = express()
.use((req, res) => res.sendFile(INDEX) )
.listen(PORT, () => console.log("Listening on localhost:" + PORT));
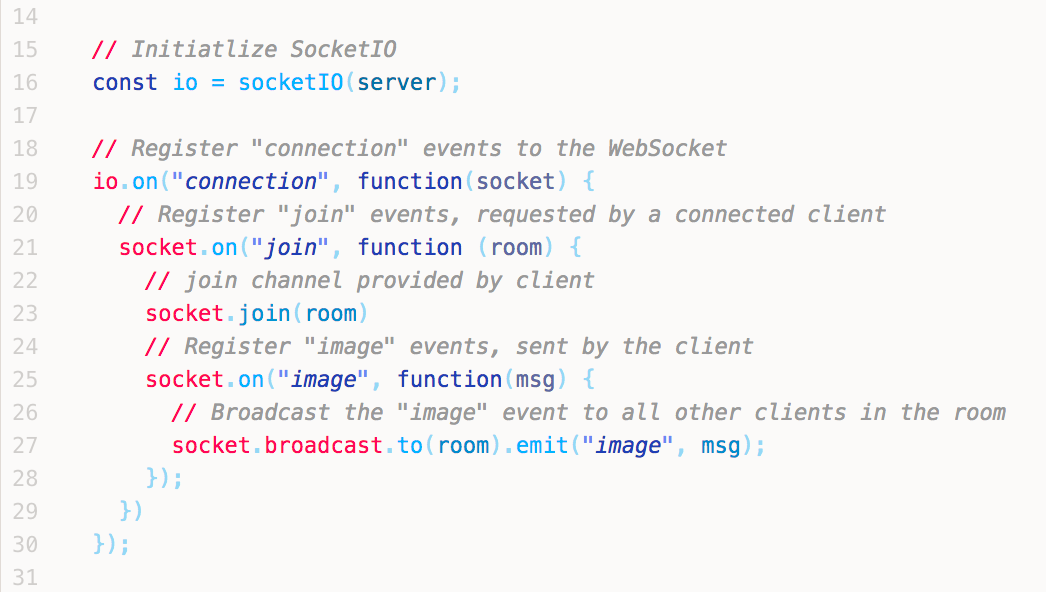
// Initiatlize SocketIO
const io = socketIO(server);
// Register "connection" events to the WebSocket
io.on("connection", function(socket) {
// Register "join" events, requested by a connected client
socket.on("join", function (room) {
// join channel provided by client
socket.join(room)
// Register "image" events, sent by the client
socket.on("image", function(msg) {
// Broadcast the "image" event to all other clients in the room
socket.broadcast.to(room).emit("image", msg);
});
})
});After importing required packages, the server will be started and it will serve a file called index.html that doesn’t exist yet. Because we might want to deploy the server on Heroku later, the port will be dynamically set by the environment variable, otherwise it defaults to 3000.
The WebSocket will then listen for clients to connect. Then, after a client requests to join a room, the WebSocket will capture and broadcast events from one client to all other clients in the same room.
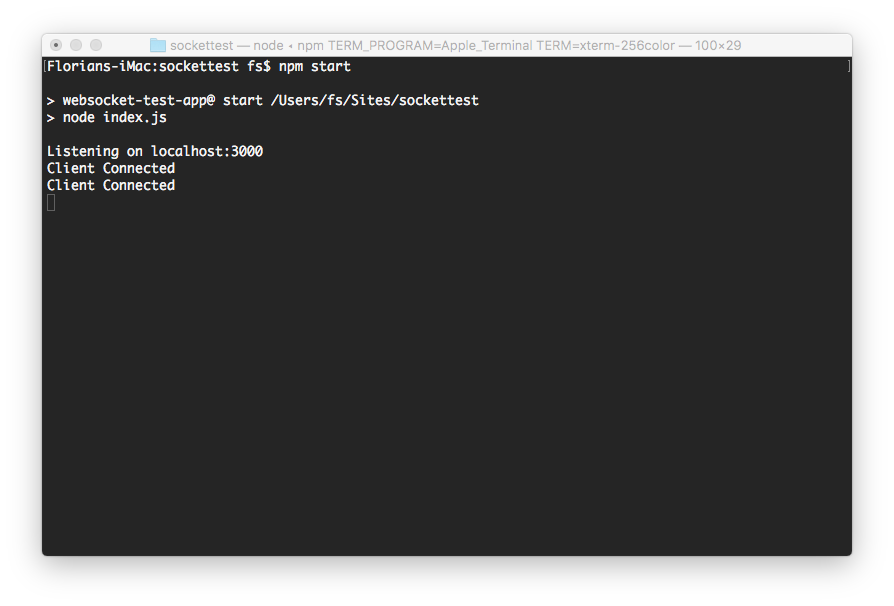
Start the server
In Terminal, type:
npm start
This will start the server at http://localhost:3000. Nothing will happen so far. But we’ll soon connect a few clients…
Client Code
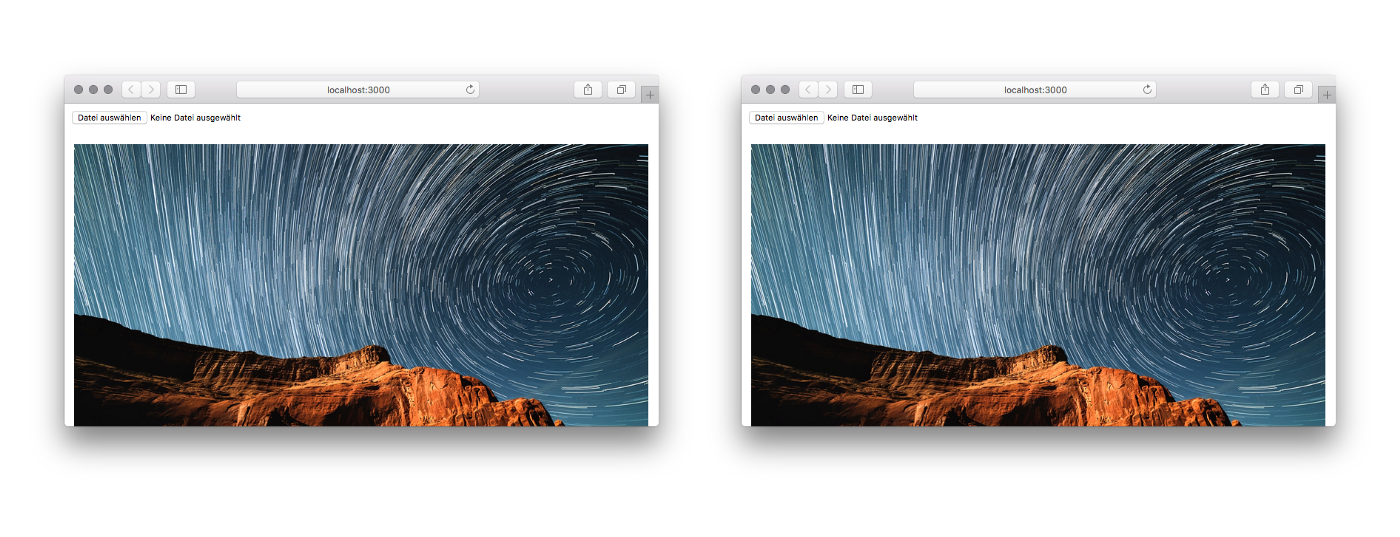
The client example shows a simple website with a file input field and an empty image element. Images selected through the file input will appear in the image element — on all websites.
In your project folder, create a file called index.html and paste the following JavaScript code:
<!DOCTYPE html>
<html>
  <head>
    <meta charset="utf-8">
    <title>SocketIO Client</title>
    <script src="/socket.io/socket.io.js"></script>
  </head>
  <body>

    <!-- File input and image output -->
    <input type="file" id="input">
    <img src="" id="output">

    <!-- Client Code -->
    <script type="text/javascript">

      // Get WebSocket
      var socket = io();

      // Get DOM elements
      var input = document.getElementById("input");
      var output = document.getElementById("output");

      // Join a channel
      var room = "test";
      socket.emit("join", room);

      // Listen to file input events
      document.getElementById("input").addEventListener("change", function (event) {

        // Prepeare file reader
        var file = event.target.files[0];
        var fileReader = new FileReader();

        fileReader.onloadend = function (event) {
          // Send an image event to the socket
          var image = event.target.result
          output.src = image;
          socket.emit("image", image);
        };

        // Read file
        fileReader.readAsDataURL(file);
      })

      socket.on("image", function (image) {
        output.src = image;
      });
    </script>
  </body>
</html>
If you now open localhost:3000 you should see a website with an input field.
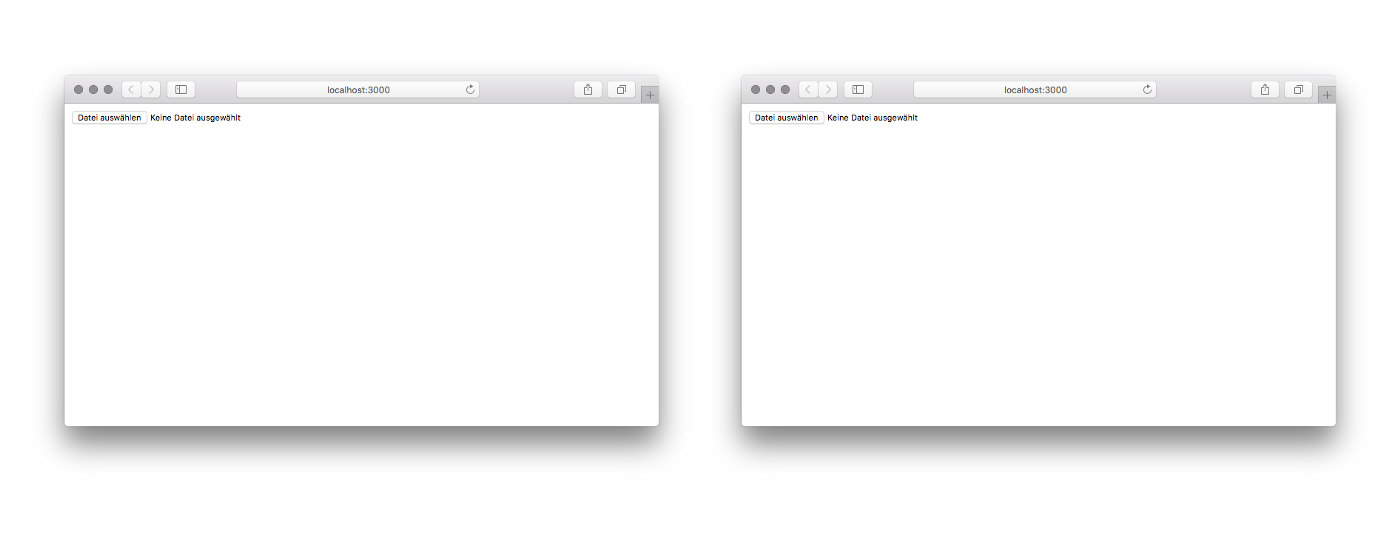
Open the website in two browsers, select an image file in one and you should see the image appear in both browsers.
In the head of the page we see a JavaScript reference to /socket.io/socket.io.js which is a magic line of code because this JavaScript file doesn’t actually exist in our project.
But because we are running our own Node.js server with SocketIO installed, it will automatically provide a client version of SocketIO that we need to communicate with the server. Alternatively, we could link to a local or CDN version of socket.io.js.
We can then get an instance of SocketIO that, by default, connects to our local server:
// Get WebSocket
let socket = io();
After getting references to DOM elements, we join a room called “test”.
// Join a channel
let room = "test";
socket.emit("join", room);
A channel name can be any string. Anyone who knows the room name could join it. In order to prevent strangers, you might want to generate very long random room names, such as 5bbad6cf-0e8d-43ce-b7d0-dc6e5726c8fa.
This so called “UUID” is almost impossible to guess. In the case of Tracy, the desktop website takes care of generating the room ID. After the website has finished loading, the ID will be generated and the “join” event will be sent to the WebSocket.
Tracy then generates a QR code containing the room ID, so that other clients can join the same room. Such UUIDs can be generated using this package: https://www.npmjs.com/package/uuid4
In our example, all clients join the same, hard-coded room called “test” so there is no need to share the name of the room between clients.
After all this, the code takes care of reacting to changes of the file input, reading the file and emitting an event to the WebSocket with the actual image data.
fileReader.onloadend = function (event) {
// Send an image event to the socket
let image = event.target.result;
output.src = image;
socket.emit("image, image);
And finally we’re also setting up a listener to receive image events that will then set the image’s src attribute.
socket.on("image", function(image) {
output.src = image;
})
In a real app, you might want to do more things such as detecting when a client connects or disconnects. Tracy also sends events when the image transfer starts and finishes so that the app can show a loading indicator.
Deploy
So far, the server and WebSocket run on our local machine. In order to make the project accessible at any time, we need to deploy it. If you don’t know how to host Node.js apps yourself, you can do this by using Heroku and Github.
- Create a Github account and push the code to a repository
- Create a Heroku account
- Create a new app on Heroku
- In the deploy tab, set up automatic deployments from Github
- Make sure you have the Node.js Buildpack enabled in your app’s settings
With this integration, every time our code changes on Github, Heroku will deploy a new version. We can then also use the public URL of our app in other client apps using WebSockets. We simply need to tell SocketIO the address of our server.
var socket = io(https://your-app.herokuapp.com);
This will allow you to create apps on your local machine and use the Heroku server for communication only.
That’s it. It took me a while to learn about WebSockets, Socket.IO and figure out how all the pieces need to be connected. After I figured it out, I was quite happy how little code is required and how powerful the concept is.
❤️ WebSockets
A note on WebRTC
If you were wondering why we’d need a server at all… good point! Since we only want to send images between two clients, we don’t need a server. With improving support of WebRTC (Web Real Time Communication), we will soon be able to reliably establish direct connections between browsers. Unfortunately, WebRTC still requires a server to authenticate and establish connections. So while in theory WebRTC would be a better fit for sharing data between browsers, the setup is not simpler than using WebSockets which have far better browser support.